Monday
Sep132010
How to Use Cinema 4D's Animation Layers Feature in R11 and Above
 Monday, September 13, 2010 at 11:52AM
For a recent project, I was stuck on a camera animation. I had built a camera animation that went along a path but then wanted to add some camera shake along the camera's X axis, like some horizontal shaking. I could have added a vibrate tag but I couldn't figure out how to get it to move the object on local coordinates instead of global coordinates.
I then remember that Maxon added Animation Layers to R11 and above. This feature allowed you to create an animation track and then build another track on top of that one without destroying the initial track. Cinema 4D blends the animations together in a nondestructive format. You could use multiple tracks to add multiple animations.
First step is to enable the feature on your object. Go to the Animation menu and select Add Animation Layer

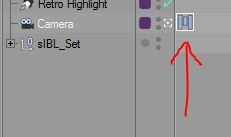
Then select the Motion Tag on your object.

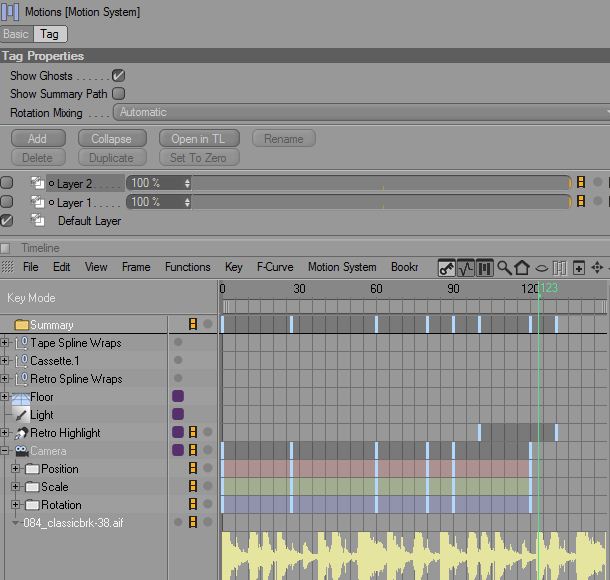
This brings up the Motion System in the Attribute Manager.

Using the feature is surprisingly simple. It adds a layer manager that includes the default layer, named appropriately Default, and a second layer named Layer 1. Checking the Default layer shows the initial animation in the Timeline.

Check Layer 1 and it will bring up a blank timeline for the object, allowing you to create a new animation without destroying your first.

Click the Add button and you can add more layers to your animation.

You can change the strength of your added animations with the Sliders next to each in the Motions Attribute tab.
One thing to keep in mind is that if you add a Sound track to animate your object along with, the track will not show up in the added layers, only the default layer. You can jump back and forth in your browser figuring out your cues, which is a huge waste of time, or you can add markers in the timeline by going to Edit > Marker > Create Marker at Current Frame.

You can then select your other tracks and the markers will carry over.

This is a great way to keep an animation and add to it without destroying your initial work. I haven't even touched on the possibilities for Character Animation.
Question, comment or a made a cool video with the technique? Post it below in the comments!
I then remember that Maxon added Animation Layers to R11 and above. This feature allowed you to create an animation track and then build another track on top of that one without destroying the initial track. Cinema 4D blends the animations together in a nondestructive format. You could use multiple tracks to add multiple animations.
First step is to enable the feature on your object. Go to the Animation menu and select Add Animation Layer

Then select the Motion Tag on your object.

This brings up the Motion System in the Attribute Manager.

Using the feature is surprisingly simple. It adds a layer manager that includes the default layer, named appropriately Default, and a second layer named Layer 1. Checking the Default layer shows the initial animation in the Timeline.

Check Layer 1 and it will bring up a blank timeline for the object, allowing you to create a new animation without destroying your first.

Click the Add button and you can add more layers to your animation.

You can change the strength of your added animations with the Sliders next to each in the Motions Attribute tab.
One thing to keep in mind is that if you add a Sound track to animate your object along with, the track will not show up in the added layers, only the default layer. You can jump back and forth in your browser figuring out your cues, which is a huge waste of time, or you can add markers in the timeline by going to Edit > Marker > Create Marker at Current Frame.

You can then select your other tracks and the markers will carry over.

This is a great way to keep an animation and add to it without destroying your initial work. I haven't even touched on the possibilities for Character Animation.
Question, comment or a made a cool video with the technique? Post it below in the comments!

Reader Comments (3)
[...] Here. Categories: Articles, Tutorials Tags: Comments (0) Trackbacks (0) Leave a comment [...]
[...] while ago I linked up a written tutorial by Jordan Montreuil where we were taught about Animation Layers in [...]
Thanks! this is gonna help out with what I've been working on:)